4 essential Google Sheets invoice template columns
Discover how to create an invoice template in Google Sheets with essential columns and formulas for dynamic financial tracking.
The SUBTOTAL function is often overlooked for invoice calculations, but it's essential for summing only visible rows after filtering, which is crucial for tracking partial payments or specific invoice items. Getting this right from the start makes your invoice template much more dynamic. If you're wondering how to create an invoice template in Google Sheets, you've come to the right place. We'll walk through building a functional template from scratch, covering the key components and formulas that make it work.
Many people start by just typing in headers and data, but a well-structured invoice template in Google Sheets requires thinking about data integrity and future usability. This means setting up your columns logically and using formulas that adapt to your entries, rather than static values. We'll cover how to set up customer information, itemized lists, and totals, ensuring accuracy and a professional look.
Setting Up Your Invoice Structure
Start by creating a new Google Sheet. You'll want to dedicate a few rows at the top for your company information and the client's details. Below that, you'll establish the line-item section where services or products are listed.
Let's consider a basic layout. In cell A1, you might put "Your Company Name." Below that, in A3, "Client Information." Then, you'll have sections for Invoice Number, Invoice Date, and Due Date. A common mistake is to scatter these details; keeping them grouped logically makes the sheet easier to read and manage.
For the line-item section, you'll need columns for:
- Item/Service Description: What you sold.
- Quantity: How many.
- Unit Price: The price per item or hour.
- Line Total: Calculated automatically.
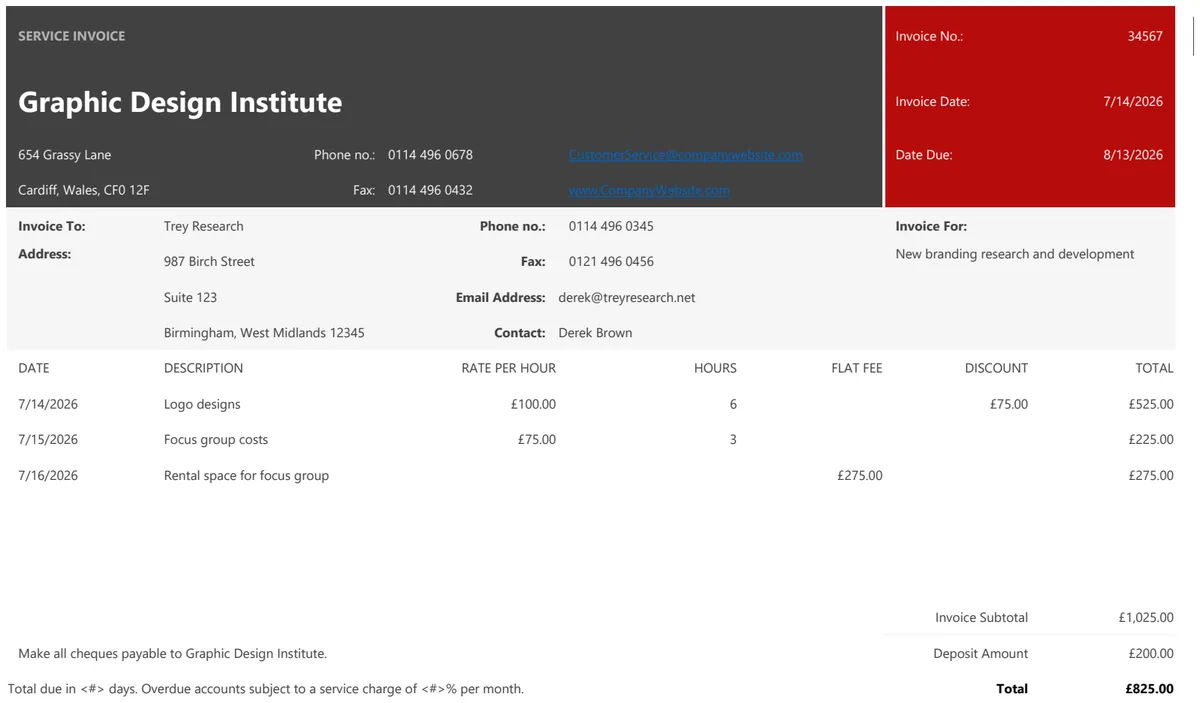
This structure is foundational. You can adapt it for specific needs, like a Service Invoice that might emphasize hours and rates, or a Simple Invoices template for straightforward product sales.
Company and Client Information
In the top section of your sheet, dedicate specific cells for your company's details and the client's. This usually includes:
- Your Company Name: Cell
A1 - Your Address: Cell
A2 - Your Phone Number: Cell
A3 - Your Email: Cell
A4
Then, for the client's details, you might use a block starting around cell F1:
- Client Name: Cell
F1 - Client Address: Cell
F2 - Client Phone: Cell
F3 - Client Email: Cell
F4
It's a good practice to label these clearly. For example, in column E, you could have "Company:", "Address:", "Phone:", "Email:" aligning with your company details, and in column G for the client's information.
Invoice Details: Numbers and Dates
Below your company information, you'll want fields for the essential invoice identifiers:
- Invoice Number: Cell
A6. This should be unique for each invoice. - Invoice Date: Cell
A7. This is the date the invoice is issued. - Due Date: Cell
A8. The date payment is expected.
You can manually enter invoice numbers, or for a more automated system, you could use a script or a separate sheet to generate sequential numbers. For dates, use Google Sheets' built-in date formatting. You can even set up a formula for the Due Date, such as =A7 + 30 to automatically make it 30 days after the Invoice Date.
Building the Line-Item Section
This is where the core of your invoice resides. Set up your headers in a row, perhaps starting in row 10:
- A10: Item/Service Description
- B10: Quantity
- C10: Unit Price
- D10: Line Total
You'll want to apply formatting to these columns. For 'Quantity', this might be a number format. For 'Unit Price' and 'Line Total', use currency formatting.
In column D, the 'Line Total' for each item will be calculated. For cell D11, the formula would be =B11*C11. This multiplies the quantity by the unit price for that row. Drag this formula down to apply it to subsequent rows as you add items.
Calculating Totals and Grand Totals
Below your line-item section, you'll need to sum up the individual line totals. Let's assume your line items go down to row 20.
In a cell below the 'Line Total' column (e.g., D22), you'll place your subtotal formula. A simple =SUM(D11:D20) will work if you're not dealing with payments or taxes directly on this invoice view.
However, for a more robust solution, especially if you plan to track payments, using the SUBTOTAL function is better. If you add a column for 'Payment Received' later, SUBTOTAL(9, D11:D20) will sum only the visible line item amounts. The 9 indicates a SUM operation. If you later filter this section to show only unpaid items, SUBTOTAL will adjust automatically.
You might also want to add fields for:
- Subtotal: Cell
D22. Formula:=SUBTOTAL(9, D11:D20) - Tax Rate: Cell
E22(e.g., enter0.08for 8%). - Tax Amount: Cell
F22. Formula:=D22*E22. Format as currency. - Total Amount Due: Cell
G22. Formula:=D22+F22. Format as currency.
This tiered calculation ensures accuracy and makes it easy to see how the final total is derived. If you're looking for a ready-made solution that handles these calculations automatically, a template like Simple Invoices by Hour and Rate might save you significant setup time.
Formatting for Professionalism
Once the formulas are in place, consider the visual presentation.
- 01Headers: Make your header row (row 10) bold and perhaps give it a background color. You can also freeze this row so it stays visible as you scroll down. Go to
View > Freeze > Up to row 10. - 02Currency: Apply currency formatting to all price and total columns (
C,D,F,G). Select the columns, then go toFormat > Number > Currency. - 03Borders: Add borders to your line-item table to make it look clean and organized. Select the range (e.g.,
A10:D20) and click the borders icon in the toolbar. - 04Company Logo: If you have a company logo, insert it near your company information using
Insert > Image > Image over cells. - 05Conditional Formatting: You could use conditional formatting to highlight overdue invoices or low stock if you were tracking inventory. For example, to highlight an invoice where the
Due Dateis past and theTotal Amount Dueis not zero, you'd select the rows you want to format, go toFormat > Conditional formatting, and set a rule like "Custom formula is"=AND(A8<TODAY(), G22<>"").
Protecting Your Template
Once you've built your invoice template and are happy with it, you might want to protect certain cells from accidental changes, especially formulas.
- 01Select all the cells you want to protect. This might be the entire line-item section, the total calculations, or even the header information.
- 02Go to
Data > Protected sheets and ranges. - 03Click "Add a sheet or range."
- 04Under "Range to protect," ensure the correct cells are selected. You can also choose to "Exclude certain cells" if needed.
- 05Click "Set permissions."
- 06Choose "Only you" or "Custom" if you're sharing the sheet and want specific people to be able to edit those protected areas.
This prevents accidental deletion of formulas or important data, ensuring your template remains functional.
Common Mistakes to Avoid
When creating an invoice template in Google Sheets, several pitfalls can trip you up.
- Not Freezing Headers: As you add more line items, scrolling up to see your company name or column headers becomes tedious. Freezing row 10 is a simple fix.
- Using Static Totals: Typing in the total amount instead of using a formula means you have to recalculate it every time. This is error-prone and inefficient. Always use
SUMorSUBTOTAL. - Poor Data Validation: Not using data validation for fields like 'Quantity' or 'Unit Price' can lead to text being entered instead of numbers, breaking your formulas. Select the cells, go to
Data > Data validation, choose "Number" and set criteria. - Ignoring Date Formatting: Entering dates as "Jan 15" instead of a proper date format (e.g.,
1/15/2024) can prevent date-based calculations and sorting. - Over-Complicating Formulas Early: While advanced functions are powerful, start with the basics like multiplication and summation. You can always build complexity later. For instance, a basic invoice can be built with just
*andSUM, before introducingVLOOKUPorXLOOKUPfor customer data.
Frequently Asked Questions About Invoice Templates
How do I automatically generate invoice numbers?
For true automation, you'd typically use Google Apps Script. However, a simpler method for manual entry is to have a dedicated cell (e.g., B6) that you increment each time you create a new invoice. You can also set up a separate hidden sheet that tracks the last used invoice number and use a formula like =INDIRECT("'Sheet2'!B1") + 1 to pull the next number, assuming Sheet2, cell B1 contains the last number.
Can I add customer details automatically?
Yes, you can use lookup functions like VLOOKUP or XLOOKUP if you maintain a separate sheet with customer information. You'd enter a customer ID or name in your invoice's client section, and the XLOOKUP formula would pull their address, phone, and email from your customer database into the invoice. For example, if your customer data is on a sheet named 'Customers' with 'CustomerID' in column A and 'Customer Name' in B, you could have CustomerID in F1 of your invoice, and in F2 (Client Name) use =XLOOKUP(F1, Customers!A:A, Customers!B:B, "Not Found").
How do I make the invoice look like a PDF?
While Google Sheets isn't a dedicated PDF creator, you can achieve a PDF-like appearance through careful formatting, as detailed in the "Formatting for Professionalism" section. Once formatted, you can download it as a PDF via File > Download > PDF document. Ensure you set the print area correctly and choose appropriate scaling options to fit everything onto a single page or a desired number of pages. For more professional PDF generation with branding and advanced features, consider dedicated invoicing software or a more specialized template.
What if I need to track payments against an invoice?
You can add columns to your line-item section or create a separate area on the invoice sheet to record payments. Add a column, perhaps E, for "Payment Received" and another, F, for "Balance Due." Your 'Balance Due' formula would then be =SUBTOTAL(9, D11:D20) - SUM(E11:E20). Using SUBTOTAL for the total amount due is essential here, as it will dynamically update if you filter out paid items. If you need a system that automatically links payments to specific invoices and tracks outstanding balances comprehensively, a dedicated invoice management tool or a more complex spreadsheet setup with linked tables might be necessary. For a simpler approach to tracking, a template like Pro Forma Invoices can help manage quotes and advance payments.