Build your first inventory spreadsheet in Excel fast
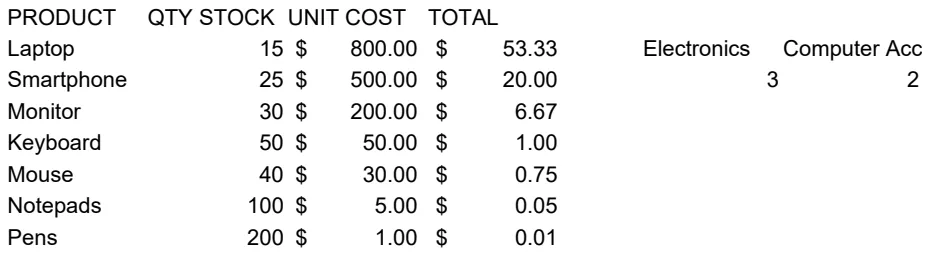
Learn how to build a robust inventory spreadsheet in Excel from scratch, turning a simple list into a powerful management tool.
A simple list of items and their quantities in Excel quickly becomes unmanageable when you need to track cost, supplier, reorder points, or even just the location of each item. If you're trying to figure out how to make an inventory spreadsheet in Excel that actually works for your business, you're likely past the point of just needing a basic count. You need a system that provides actionable data, not just a static record.
This guide will walk you through building a robust inventory spreadsheet from scratch, covering essential fields, formulas, and formatting to turn a simple list into a powerful management tool. We'll cover common pitfalls and offer practical advice, ensuring your spreadsheet supports your operational needs.
Essential Columns for Your Inventory Sheet
When you're setting up your inventory spreadsheet, think about the information you actually need to make decisions. A common mistake is to include too little detail, making the spreadsheet redundant, or too much, making it cumbersome. Here’s a breakdown of columns that provide a solid foundation:
- Item ID: A unique identifier for each product. This could be a SKU (Stock Keeping Unit), a part number, or a simple sequential number. This is crucial for avoiding duplicates and for linking to other data if needed.
- Item Name/Description: A clear, concise name for the product. Be descriptive enough so that anyone can identify the item.
- Category: Grouping items by type (e.g., "Electronics," "Apparel," "Office Supplies") helps with analysis and organization.
- Unit of Measure: How is the item sold or counted? (e.g., "Each," "Pair," "Box," "Kg").
- Quantity on Hand: The current physical count of the item. This is the core metric for inventory.
- Reorder Point: The minimum quantity you want to have before needing to place a new order. This is critical for preventing stockouts.
- Cost Per Unit: The cost to acquire one unit of the item. This is essential for calculating inventory value.
- Total Cost: Calculated by multiplying "Quantity on Hand" by "Cost Per Unit."
- Supplier: Who do you buy this item from?
- Supplier Part Number: The supplier's specific part number for this item, useful for reordering.
- Location: Where is the item stored within your warehouse or store? (e.g., "Aisle 3, Shelf B," "Bin 12").
- Date Last Updated: When was this item's record last modified? Helps ensure data accuracy.
Setting Up Your Base Sheet
Let's assume you're starting with a blank Excel workbook.
- 01Open a New Workbook: Launch Excel and select "Blank workbook."
- 02Rename the Sheet: Double-click the "Sheet1" tab at the bottom and rename it to something like "Inventory List."
- 03Add Headers: In the first row (Row 1), enter the column headers we discussed above. For example, in cell A1, type "Item ID"; in B1, type "Item Name"; and so on.
- 04Format Headers: Select Row 1. Make the text Bold, Center align it, and maybe add a Fill Color to make it stand out. This makes your sheet much easier to read.
- 05Adjust Column Widths: Double-click the right edge of each column header to auto-fit the column width to its content, or manually drag the edges to your preferred width.
This basic setup is the foundation for how to make an inventory spreadsheet in Excel that will grow with your needs.
Calculating Total Inventory Value
One of the most important aspects of inventory management is understanding its financial value. This tells you how much capital is tied up in your stock.
First, ensure you have the "Quantity on Hand" and "Cost Per Unit" columns populated correctly. Let's say:
- Column E is "Quantity on Hand."
- Column G is "Cost Per Unit."
- Column H is where you want to calculate "Total Cost."
In cell H2 (assuming your first item's data starts on Row 2), enter the following formula:
=E2*G2
This formula multiplies the quantity in E2 by the cost in G2.
To apply this to all your items:
- 01Enter the Formula: Type the formula in H2 and press Enter.
- 02Fill Down: Select cell H2. You'll see a small square (the fill handle) at the bottom-right corner of the cell. Double-click this fill handle, or click and drag it down to the last row of your data. Excel will automatically adjust the cell references (E3\G3, E4\G4, etc.) for each row.
This simple multiplication gives you the total value for each item. To get your overall inventory value, you can use the SUM function in a cell below your "Total Cost" column (e.g., in H50 if your data goes down to row 49):
=SUM(H2:H49)
This gives you a single figure representing the total monetary value of all items currently in stock. If you need more sophisticated value tracking, like considering different cost methods (FIFO, LIFO), you might find a template like the Inventory Cost Template helpful.
Implementing Reorder Points and Alerts
Preventing stockouts is a primary goal of inventory management. Setting reorder points and creating alerts helps you stay ahead.
Let's assume:
- Column E is "Quantity on Hand."
- Column F is "Reorder Point."
- You want to highlight rows where the quantity is at or below the reorder point.
You can use Conditional Formatting for this:
- 01Select Data: Highlight the range of cells containing your item data, excluding the headers (e.g., A2:L49, assuming your data goes down to row 49 and includes columns A through L).
- 02Open Conditional Formatting: Go to the "Home" tab on the ribbon, click "Conditional Formatting," and select "New Rule."
- 03Choose Rule Type: Select "Use a formula to determine which cells to format."
- 04Enter the Formula: In the "Format values where this formula is true" box, enter the following formula. Important: Ensure the column references are correct for your sheet. If "Quantity on Hand" is in column E and "Reorder Point" is in column F, and your selection starts on row 2, the formula would be:
=$E2<=$F2 The dollar signs ($) lock the column reference so it always checks columns E and F, but the row number (2) will adjust for each row in your selection.
- 05Set Formatting: Click the "Format..." button. Go to the "Fill" tab and choose a color (e.g., light red). You can also format the font to be bold or a different color under the "Font" tab. Click "OK" twice.
Now, any row where your "Quantity on Hand" is less than or equal to your "Reorder Point" will be highlighted, visually alerting you to items that need restocking.
Tracking Item Locations
For businesses with more than a few items, knowing where things are stored is vital for efficiency. A simple "Location" column (e.g., Column J) can save significant time searching.
You might use a consistent format for your locations, such as:
- Aisle Number - Shelf Number - Bin Number (e.g., "A3-S2-B5")
- Warehouse Section - Rack Number - Shelf Level (e.g., "WH1-R4-L3")
When you enter new stock or pick items for orders, make sure this field is updated accurately. If you have a very large inventory spread across multiple areas, a dedicated template like the Data Inventory Template Letter might offer more structured fields for location details.
Common Mistakes to Avoid
Building an inventory spreadsheet is straightforward, but several common errors can undermine its usefulness:
- Inconsistent Data Entry: Not using the same format for similar data (e.g., "Box" vs. "boxes," "Kg" vs. "kilograms") makes sorting and filtering difficult. Standardize your units of measure.
- Lack of Unique Identifiers: Relying solely on item names can lead to confusion if you have similar products. Always use a unique Item ID.
- Outdated Information: The spreadsheet is only as good as the data in it. Neglecting to update quantities or costs means the data is unreliable. Schedule regular checks.
- Ignoring Reorder Points: Setting reorder points but not acting on them defeats the purpose. Regularly review your highlighted items.
- Overly Complex Formulas: While advanced formulas can be powerful, they can also be hard to troubleshoot. Stick to simpler, understandable calculations for core inventory tracking.
- No Backup: Losing your spreadsheet could be catastrophic. Save copies regularly, or use cloud-based storage like OneDrive or Google Drive.
Advanced Features and Next Steps
Once your basic inventory spreadsheet is functional, you might consider adding more advanced features:
Tracking Inventory Turnover
Understanding how quickly your inventory is selling is key to managing cash flow and identifying slow-moving or obsolete stock. You can calculate inventory turnover by dividing the Cost of Goods Sold (COGS) by the Average Inventory Value. For a more detailed analysis over time, consider using a template specifically designed for this, such as the Inventory Turnover Analysis Template.
Managing Equipment Inventory
If you're tracking assets like tools, machinery, or IT equipment, you'll have different needs than tracking consumable goods. This often includes depreciation calculations and warranty information. An Equipment Inventory Template can be a good starting point for managing these types of assets.
Version Control and History
For critical inventory data, consider how you'll manage changes. You could:
- Add a "Date Last Updated" Column: As mentioned earlier, this helps track recent activity.
- Maintain Historical Data: Copy your entire inventory list at the end of each month or quarter into a new sheet or workbook. Rename these sheets clearly (e.g., "Inventory - Jan 2026," "Inventory - Feb 2026"). This allows you to look back at historical stock levels and values.
Integrating with Other Systems
As your business grows, you might eventually need to integrate your inventory data with sales, accounting, or e-commerce platforms. While Excel is a great starting point, for larger operations, dedicated inventory management software might become necessary. However, a well-structured Excel sheet can serve as a reliable database for many small to medium-sized businesses.
Using Data Validation for Consistency
To help prevent data entry errors, use Excel's Data Validation feature. For example, you can set up a list for your "Unit of Measure" column so users can only select from predefined options like "Each," "Pair," "Set," etc. To do this:
- 01Create a separate sheet or a range on your current sheet with your list of valid units (e.g., in cells M1:M5, list "Each," "Pair," "Box," "Kg," "Litre").
- 02Go back to your "Inventory List" sheet. Select the cells in the "Unit of Measure" column where you want to apply this (e.g., D2:D100).
- 03Go to the "Data" tab, click "Data Validation."
- 04Under "Allow," choose "List."
- 05In the "Source" box, click the arrow and select the cells containing your list of units (e.g., =$M$1:$M$5).
- 06Click "OK." Now, when you click on a cell in that column, a dropdown arrow will appear, letting you select a unit.
This approach ensures consistency and speeds up data entry, making how to make an inventory spreadsheet in Excel a more efficient process overall.
What if I have thousands of items?
For very large inventories, Excel can become slow. Consider breaking your inventory into multiple sheets by category if performance degrades. Alternatively, exploring dedicated inventory management software might be more suitable for managing tens of thousands of items. Our library includes templates that can help with specific aspects, such as cost tracking or turnover analysis, which might be useful even with large datasets.
Can I track items that are on order?
Yes, you can add columns for "Quantity on Order" and "Expected Delivery Date." You would then adjust your "Quantity on Hand" formula to be =[Quantity on Hand] + [Quantity on Order] if you want to see your total projected stock, or keep them separate for clarity.
How often should I update my inventory?
This depends on your business volume and item velocity. For fast-moving items, daily or weekly updates are advisable. For slower-moving or high-value items, a weekly or bi-weekly review might suffice. The key is consistency.
What's the best way to find pre-built inventory templates?
Many resources offer pre-built templates. For a one-time fee of $9, you can access our entire library of over 100 templates, including various inventory management solutions, allowing you to find exactly what you need without repeated purchases. You can explore our templates section to see the full range.