Excel catering order form: build yours in minutes
Stop wrestling with spreadsheets. A catering order form template in Excel saves you time and reduces errors in your event planning.
Trying to manage catering orders with a generic spreadsheet means you're likely spending more time wrestling with formatting and manual calculations than actually planning events. A well-designed catering order form template Excel can save you hours by standardizing information capture, automating totals, and reducing errors. Imagine a system where clients can clearly select menu items, specify quantities, and provide delivery details, all feeding directly into a structured order record. This isn't about reinventing the wheel; it's about using a tool that's built for the job.
You need a system that handles the nuances of catering: per-person pricing, minimum order quantities, delivery surcharges, and specific dietary notes. A simple blank sheet rarely accommodates these complexities without significant, ongoing manual intervention. This is where a dedicated template shines, providing a framework that guides both you and your client through the ordering process efficiently.
Why a Template Beats a Blank Sheet
When you're running a catering business, every minute counts. A blank Excel sheet might seem flexible, but it quickly becomes a liability. You'll spend time creating headers, defining data formats, and building formulas from scratch. What happens when you need to add a new menu item with a different pricing structure, or when a client requests a special dietary modification? Without a pre-built structure, these scenarios lead to formula errors, inconsistent data entry, and potentially costly mistakes. A dedicated template, like a Catering Order Form Template, pre-defines these fields, ensuring all necessary information is collected consistently.
Essential Components of a Catering Order Form
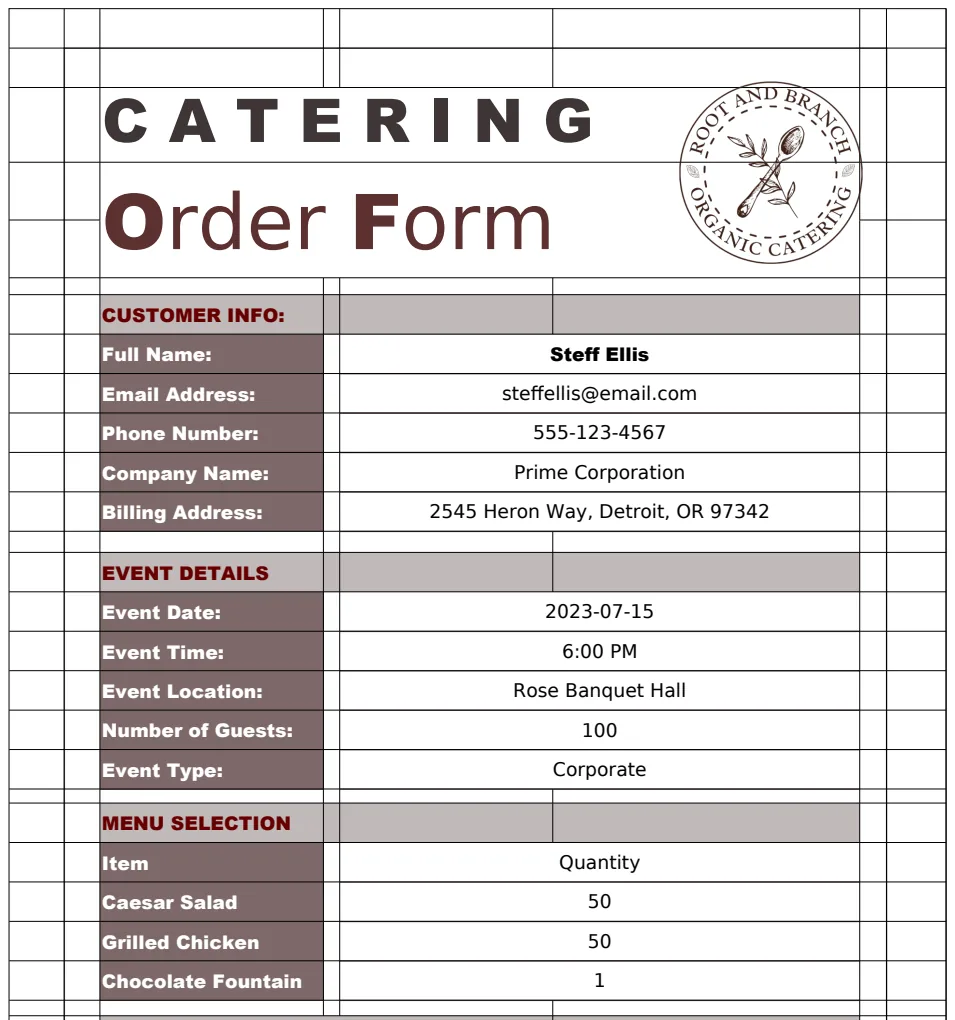
A robust catering order form needs more than just customer contact details. Here are key elements you should include:
- Client Information: Name, company (if applicable), phone number, email address, billing address, and delivery address.
- Event Details: Date of event, start time, end time, event type (e.g., corporate lunch, wedding reception, birthday party), and estimated guest count.
- Menu Selection: This is the core. It should clearly list:
- Menu Item Name
- Description (optional, but helpful for clarity)
- Pricing Unit (e.g., per person, per platter, per dozen)
- Quantity Ordered
- Price Per Unit
- Line Item Total (Quantity \* Price Per Unit)
- Dietary Restrictions/Special Requests: A dedicated section for notes on allergies (e.g., gluten-free, nut-free, vegetarian, vegan) and any specific preparation instructions.
- Service Requirements: Details on staffing needs (servers, bartenders), setup time, breakdown time, and any specific venue requirements.
- Delivery & Setup Fees: Itemized charges for delivery, setup, and potential return pickup of equipment.
- Payment Information: Deposit amount, due date, final payment due date, and accepted payment methods.
- Terms & Conditions: Cancellation policy, liability clauses, and other important contractual details.
- Order Summary: A clear breakdown of subtotal, taxes, fees, and the final grand total.
- Authorization: A space for client signature and date to confirm the order.
Setting Up Your Catering Order Form in Excel
Let's walk through building a basic structure in Excel. We'll assume you've downloaded a starter template or are building one yourself.
- 01Create Your Menu Master List: Before you even start the order form, create a separate sheet for your entire catering menu. This sheet should include:
Menu Item ID(Optional, but useful for lookups)Item NameDescriptionPricing Unit(e.g., "Per Person", "Per Tray", "Per Dozen")Base Price
- 02Design the Client Input Section: On your main "Order Form" sheet, dedicate the top section to client and event details. Use clear labels like "Client Name:", "Event Date:", "Delivery Address:", etc.
- 03Build the Itemized Order Table: This is where the magic happens. Set up columns for:
Item NameDescription(This can be a lookup from your menu list)Pricing Unit(Lookup)Quantity(This is where the client or your staff enters a number)Price Per Unit(This will be a formula)Line Total(This will also be a formula)
- 04Implement Formulas for Pricing:
- Price Per Unit: If your menu is priced per person, and the client enters "Quantity" as the number of guests, this formula will look up the base price from your menu sheet. A common approach is to use
XLOOKUPorVLOOKUP. For example, ifItem Nameis inA10andQuantityis inD10, and your menu is on a sheet namedMenuDatawith item names in column A and prices in column E:
=XLOOKUP(A10, MenuData!$A:$A, MenuData!$E:$E, "Item Not Found", 0) This formula finds the Item Name in A10 within the MenuData sheet's column A, and returns the corresponding value from MenuData's column E (the Base Price). You might need to adjust this based on your Pricing Unit. If it's "Per Tray", the Quantity entered would be the number of trays.
- Line Total: This is a straightforward multiplication:
=D10 * G10 (Assuming Quantity is in D10 and Price Per Unit is in G10).
- 05Calculate Totals: Below your itemized table, create cells for:
Subtotal:=SUM(H10:H100)(Adjust the range H100 to cover all possible line items).Tax Rate: You might have this as a fixed percentage or a lookup.Tax Amount:=Subtotal * Tax RateDelivery Fee: A manually entered or calculated value.Other Fees: For any additional charges.Grand Total:=Subtotal + Tax Amount + Delivery Fee + Other Fees
- 06Add Conditional Formatting: Use conditional formatting to highlight potential issues. For instance, you could flag orders where the
Quantityentered is less than a minimum set for a particular item, or highlight cells wherePrice Per Unitreturned an error.
Automating with Data Validation
Data validation is crucial for ensuring data integrity. For the Item Name column in your order table, you can set up data validation to create a dropdown list populated from your menu names. This prevents typos and ensures that your XLOOKUP or VLOOKUP formulas will always find a match.
- 01Go to the
Item Namecolumn (e.g., column A) on your "Order Form" sheet. - 02Select the cells where you want the dropdown (e.g.,
A10:A100). - 03Go to the "Data" tab in Excel and click "Data Validation".
- 04In the "Allow" dropdown, select "List".
- 05In the "Source" box, enter
=MenuData!$B$2:$B$50(adjustB2:B50to match the range of your item names on theMenuDatasheet). - 06Click "OK".
Now, when you click on a cell in that range, a dropdown arrow will appear, allowing you to select an item directly from your menu.
Common Mistakes to Avoid
- Not Having a Separate Menu Sheet: Trying to manage menu items, descriptions, and prices directly on the order form itself is inefficient and error-prone. A dedicated menu sheet allows for easier updates and consistent pricing.
- Manual Price Calculations: Relying on manual input for
Price Per UnitorLine Totalopens the door to significant errors. Automate these with formulas. - Ignoring Dietary Needs: Failing to provide a clear section for allergies and dietary restrictions can lead to serious client dissatisfaction and potential health risks.
- Inconsistent Fee Structures: Not clearly itemizing delivery, setup, or service fees can lead to disputes. Ensure these are transparent and easily calculable.
- Over-Complicating Formulas: While powerful, complex nested
IFstatements or overly longVLOOKUPs can be hard to debug. Keep formulas as clear and concise as possible. UsingXLOOKUPis often simpler thanVLOOKUPwithIFERROR. - No Clear Grand Total: Clients need to see the final price at a glance. Ensure your summary section is prominent and accurate.
Customizing Your Template Further
Once you have a functional catering order form template Excel, you can enhance it. Consider adding:
- Images: For high-end catering, including small images of popular dishes next to their names can be a nice touch.
- Conditional Formatting for Status: Add a "Status" column (e.g., "Pending", "Confirmed", "Invoiced", "Completed") and use conditional formatting to visually track orders.
- Version Control: If you frequently update your menu or pricing, consider adding a version number or date to your template.
- Integration with Other Sheets: Link your order form data to a master "Orders Log" or an "Invoice Generator" sheet for a more comprehensive system.
If building this from scratch feels overwhelming, you can find pre-built options. For instance, a Food Order Form Template can be adapted, or you might find a more specialized Order Form Template that fits your needs perfectly. Many professional templates are available for a one-time fee, offering significant time savings.
How to Handle Rush Orders?
For rush orders, you'll need a way to flag them and potentially apply a surcharge. You can add a "Rush Order?" checkbox or a dropdown field. If checked or selected, a formula can automatically add a predefined rush fee to the Other Fees line item or adjust the Delivery Fee. You might also want to use conditional formatting to make rush orders stand out visually on your order log.
What if a Client Changes Their Mind After Submitting?
Your template should accommodate changes. The best approach is to treat a revised order as a new version. You can either create a new order entry or, if your system is robust, have a "Revision History" section. At a minimum, ensure your Terms & Conditions clearly state your policy on order modifications and any associated deadlines or fees. Make sure your formulas and lookups are dynamic enough to recalculate easily when quantities or items change.
Can I Use This for Both In-Person and Delivery Orders?
Absolutely. Ensure your client information section has distinct fields for "Billing Address" and "Delivery Address." You can then use formulas to apply delivery charges only when a delivery address is provided and differs from the billing address, or based on a specific "Order Type" selection (e.g., "Pickup," "Delivery," "On-Site Event"). The core item selection and pricing logic remains the same regardless of the fulfillment method.