Track Airbnb expenses, gain clarity now
This Airbnb expense tracker spreadsheet template categorizes every dollar spent on your rental property, providing a clear overview of your profitability.
By the end of this, you'll have a functioning airbnb expense tracker spreadsheet template that categorizes every dollar spent on your rental property, from cleaning supplies to mortgage interest, providing a clear overview of your profitability. This isn't just about recording expenses; it's about building a system to understand your business's financial health at a glance.
Setting up a dedicated airbnb expense tracker spreadsheet template is crucial for any host serious about maximizing their rental income. Without one, it's easy for small costs to add up, eat into profits, and make it difficult to identify areas where you might be overspending. This template will serve as your central hub for all financial data related to your short-term rental.
Why Track Airbnb Expenses?
Beyond simple accounting, tracking your Airbnb expenses offers several significant benefits. Firstly, it provides a clear picture of your net operating income. This is the money left after deducting all operating expenses but before accounting for taxes or loan interest. Knowing this figure helps you assess the true performance of your property. Secondly, detailed expense tracking is essential for tax purposes. Many expenses related to your rental property are tax-deductible. Having a well-organized record means you can claim all eligible deductions, potentially lowering your tax liability significantly. Think about repairs, maintenance, property management fees, insurance, utilities, and even a portion of your home office expenses if you manage the property yourself. Finally, it allows you to identify trends and areas for cost savings. Are your cleaning costs creeping up? Is your utility bill unusually high for a specific month? This data highlights opportunities to optimize spending and improve your bottom line.
Essential Columns for Your Tracker
When building your airbnb expense tracker spreadsheet template, focus on clarity and comprehensiveness. You’ll want to capture key pieces of information for each transaction. Start with these essential columns:
- Date: The date the expense occurred. This is vital for chronological tracking and tax reporting.
- Category: This is where you’ll classify the expense (e.g., Cleaning, Maintenance, Utilities, Supplies, Marketing, Mortgage Interest, Property Taxes, Insurance, Travel, Fees, etc.). Be specific enough to be useful but not so granular that it becomes overwhelming.
- Sub-Category (Optional but Recommended): For broader categories like "Maintenance," you might want to specify "Plumbing," "Electrical," or "General Repairs." This adds another layer of detail for analysis.
- Description: A brief, clear description of the expense. Instead of just "Supplies," write "Bleach and sponges" or "New towels."
- Amount: The exact cost of the expense.
- Payment Method: How you paid (e.g., Credit Card, Debit Card, Cash, Bank Transfer). This can be useful for reconciling bank statements.
- Receipt/Invoice Number (Optional): If you have a system for numbering receipts, include this for easy cross-referencing.
- Notes: Any additional relevant information, like "Tenant requested repair" or "Expensed as part of larger project."
- Tax Deductible (Yes/No): A simple flag to quickly identify which expenses can be claimed on your taxes.
Setting Up Your Spreadsheet
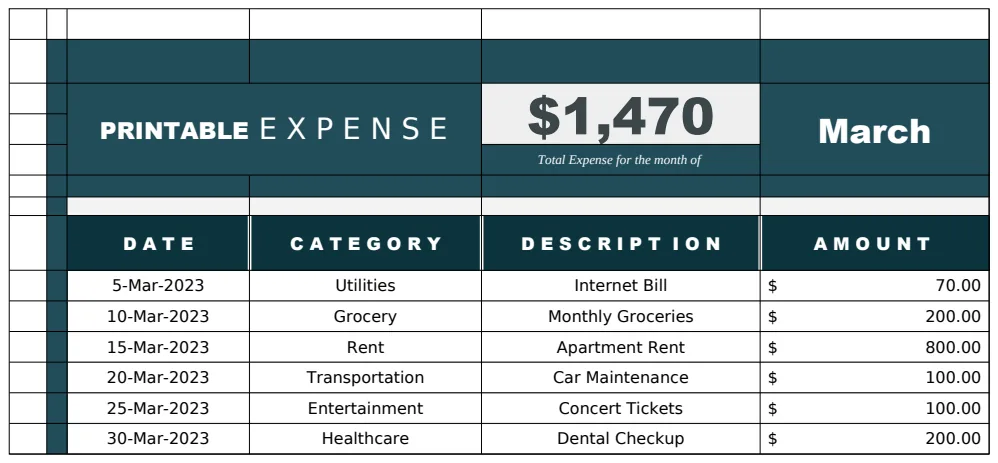
You can create this from scratch in Excel or Google Sheets, or you can adapt a pre-built solution. For instance, a Printable Expense Template can be a good starting point for its structured approach to tracking.
Here’s a step-by-step walkthrough to build a basic tracker:
- 01Open a New Spreadsheet: In Excel or Google Sheets, create a new blank workbook.
- 02Create Sheet Tabs: Rename Sheet1 to "Expenses." You might also want a "Categories" sheet where you list all your allowable expense categories. This ensures consistency.
- 03Set Up Headers: In the "Expenses" sheet, enter your chosen column headers in the first row (e.g., Date, Category, Description, Amount, Tax Deductible).
- 04Format Cells:
- Format the "Date" column as Date.
- Format the "Amount" column as Currency.
- For the "Category" column, you can use Data Validation to create a dropdown list pulling from your "Categories" sheet. This prevents typos and ensures all entries are valid. Select the entire "Category" column (or the range you expect to use), go to Data > Data Validation, and set the criteria to "List from a range," pointing it to your list of categories on the other sheet.
- For the "Tax Deductible" column, use Data Validation to create a dropdown with "Yes" and "No."
- 05Enter Sample Data: Populate a few rows with hypothetical expenses to test your setup.
- 06Add a Summary Sheet (Optional but Recommended): Create another sheet called "Summary." Here, you can use formulas to pull totals from your "Expenses" sheet. For example, you could sum expenses by category using
SUMIFS.
Example Summary Formulas:
If your "Expenses" sheet has categories in column B and amounts in column D, and you want to sum all "Maintenance" expenses, in your "Summary" sheet you might have "Maintenance" in cell A1. Then, in cell B1, you'd use a formula like:
=SUMIFS(Expenses!D:D, Expenses!B:B, A1)
This formula sums all values in column D of the "Expenses" sheet where the corresponding value in column B of the "Expenses" sheet equals the value in cell A1 of the "Summary" sheet. You can then copy this formula down for all your categories.
Common Mistakes to Avoid
Many hosts fall into a few traps when setting up their expense tracking. Being aware of these can save you headaches later.
- Inconsistent Categorization: Not using a consistent set of categories or sub-categories. This makes it impossible to compare expenses over time or get a clear picture of where money is going. Using a dropdown list via data validation is the best way to combat this.
- Ignoring Small Expenses: Thinking that a $5 purchase isn't worth tracking. These small costs add up quickly and, more importantly, many are tax-deductible. Every expense should be logged.
- Not Keeping Receipts: While your spreadsheet is the record, having the actual receipt or invoice is your proof for tax authorities. Digitize them if possible (take photos, scan) and store them systematically, perhaps linking to them from your spreadsheet if you use cloud storage.
- Waiting Too Long to Enter Data: Expenses should be entered regularly, ideally daily or weekly. Waiting until the end of the month (or longer) means you’re more likely to forget details or miscategorize items.
- Not Tracking Income: While this article focuses on expenses, remember to track your income just as diligently. Without income data, expense tracking alone doesn't tell you if your Airbnb is profitable. A template like the Finance Tracker Budget Template can help integrate both.
Advanced Tracking & Analysis
Once your basic airbnb expense tracker spreadsheet template is set up, you can enhance it.
Using Conditional Formatting
Conditional formatting can make your data more visually digestible. For example, you could:
- Highlight Large Expenses: Set a rule to highlight any expense over a certain amount (e.g., $500) in yellow.
- Color-Code Tax Deductible Items: Automatically turn the row green if "Tax Deductible" is marked as "Yes."
- Identify Overspending in Categories: If you’ve set up a budget on your "Summary" sheet, you can use conditional formatting to highlight categories where actual spending exceeds the budget.
Tracking Income Alongside Expenses
To get the full financial picture, you need to track income. Create columns for:
- Booking Date: When the booking was made.
- Check-in Date: When the guest arrived.
- Nights: Number of nights stayed.
- Gross Revenue: The total amount paid by the guest.
- Platform Fees: Airbnb's service fees.
- Net Income: Gross Revenue minus Platform Fees.
You can then add formulas to your "Summary" sheet to calculate total net income and total expenses, and finally, your Net Profit (Net Income - Total Expenses).
Automating with Formulas
Beyond SUMIFS, consider other useful formulas:
- `AVERAGEIFS`: To find the average expense for a specific category or month.
- `COUNTIFS`: To see how many times a specific expense category was used.
- `XLOOKUP` (or `VLOOKUP`): Useful if you have separate sheets for property details or vendor information that you want to pull data from.
Frequently Asked Questions
How often should I update my Airbnb expense tracker?
Ideally, you should update your expense tracker daily or at least weekly. This ensures accuracy and prevents small expenses from being forgotten. Entering data shortly after a transaction occurs is the most effective habit.
Can I use a general expense tracker for my Airbnb?
While a general expense tracker can work, a dedicated airbnb expense tracker spreadsheet template is far more effective. It allows for specific categories relevant to property management, such as cleaning, guest amenities, and repairs, which might not exist in a standard personal finance template. A template like the Expense Tracker Template could be customized, but starting with one designed for rentals is often simpler.
What if I have multiple Airbnb properties?
If you manage multiple properties, you have a few options. You could create a separate tab for each property within a single workbook, ensuring clear labeling for each. Alternatively, you could create entirely separate workbooks for each property if their financial data needs to be kept completely isolated. This approach requires more management but can offer better clarity for very complex operations.
What are the main tax deductions for Airbnb hosts?
Common tax deductions include mortgage interest, property taxes, insurance premiums, repairs and maintenance, utilities, cleaning and laundry services, supplies, property management fees, advertising costs, and depreciation on the property and furnishings. Always consult with a tax professional to confirm what is deductible for your specific situation.