5 key budget spreadsheet sections for students
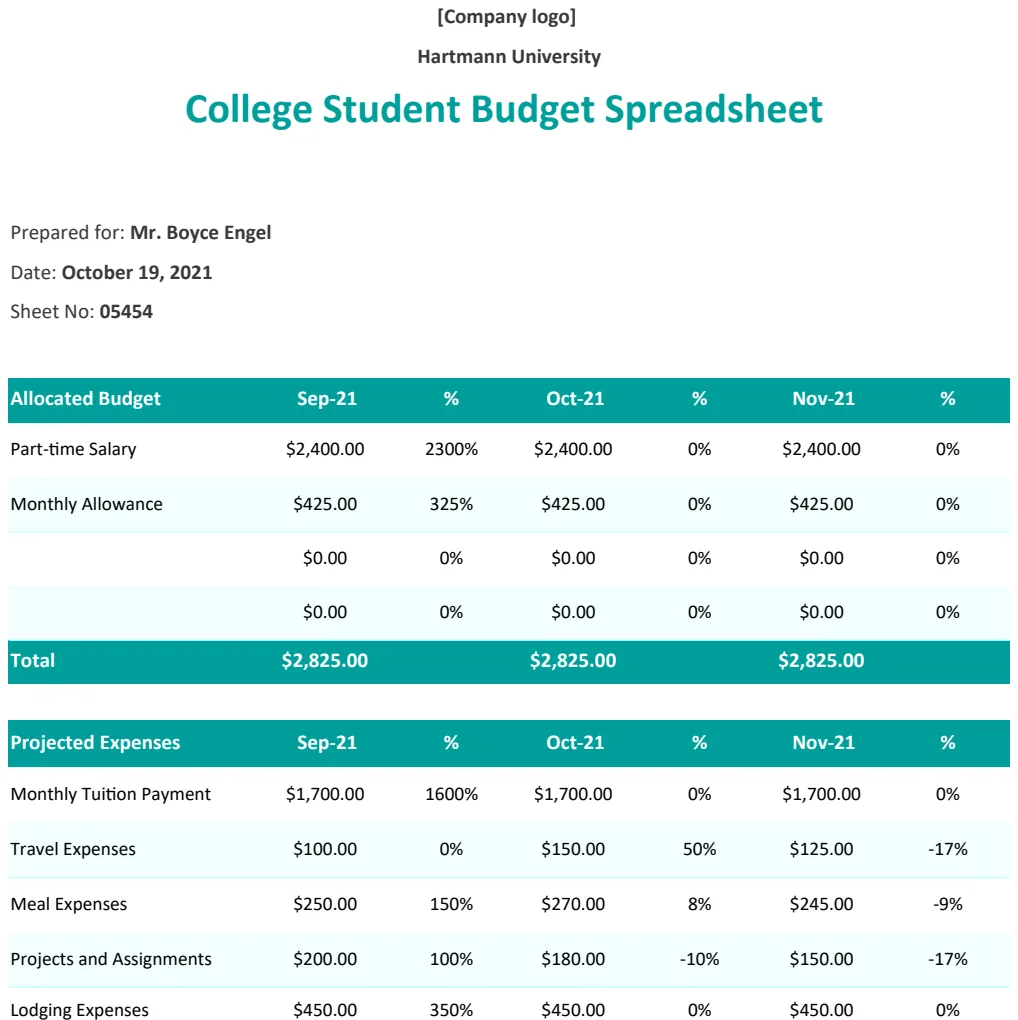
A college student budget spreadsheet template is crucial for managing your money effectively. Learn the key sections.
Manually tracking your college spending with a notebook will eventually fail you. A dedicated college student budget spreadsheet template offers a far more robust and revealing way to manage your money. It’s not about fancy formulas from day one; it’s about creating a system that makes sense for how you actually spend your money.
You might think a simple list of expenses is enough, but a good template helps you categorize, forecast, and identify spending patterns you might otherwise miss. This approach goes beyond just recording where money went; it helps you plan where it should go, which is critical for students navigating tuition, rent, books, and social life.
Why a Spreadsheet Beats a Notebook
A notebook can track individual transactions. That’s it. A spreadsheet, however, provides structure. You can assign categories like "Tuition," "Rent," "Groceries," "Textbooks," "Social," and "Transportation." This allows for immediate aggregation. Instead of flipping through pages to see how much you spent on food, a spreadsheet sums it up instantly. This immediate feedback is invaluable for making quick adjustments to your spending habits. For instance, if you see your "Eating Out" category is already at $200 by mid-month, you know you need to cut back significantly for the rest of the month to stay within your $300 budget.
Furthermore, spreadsheets offer powerful analytical tools. You can create charts to visualize your spending, compare months, or even forecast future expenses based on past performance. This level of insight is simply not possible with manual pen-and-paper tracking. The structure provided by a college student budget spreadsheet template transforms raw data into actionable financial intelligence. This means you can not only see that you overspent on entertainment last month, but why, and then proactively adjust for the current month.
Essential Components of Your College Budget
When setting up your budget, focus on a few key areas. Every student’s situation differs, but these core elements form the backbone of sound financial management. Think of these as the foundational pieces that will help you build a comprehensive financial picture.
Income Sources:
- Part-time Job: Your regular wages, after taxes if possible, to get a true picture of take-home pay.
- Scholarships/Grants: Funds that don't need repayment. Be sure to note if these are disbursed per semester or monthly.
- Student Loans: Money borrowed for education. It's crucial to distinguish between living expenses loans and tuition-specific funds.
- Family Contributions: Any regular support from parents or guardians.
- Other: Freelance work, selling items, reimbursements, or any other irregular income streams.
Fixed Expenses (These generally stay the same each month):
- Tuition & Fees: If not paid in a lump sum per semester. If paid by semester, divide the total by the number of months in the semester for a monthly budget figure. For example, $5,000 tuition over 4 months is $1,250 per month.
- Rent/Dorm Fees: Your primary living cost.
- Loan Payments: For any existing loans, including car loans or personal loans.
- Subscriptions: Streaming services, software licenses, cloud storage, or any recurring monthly charges.
- Gym Membership: If applicable.
Variable Expenses (These fluctuate):
- Groceries: How much you spend on food, toiletries, and other household supplies. This can vary wildly based on your cooking habits and dietary needs.
- Utilities: Electricity, internet, phone bills (if not included in rent). Consider averaging these over the year if they fluctuate seasonally.
- Textbooks & Supplies: A significant cost, often concentrated at semester start. It’s wise to budget for this before the semester begins, perhaps by setting aside a portion of your income each month.
- Transportation: Gas, public transport fares, ride-sharing services, car maintenance.
- Personal Care: Toiletries, haircuts, clothing, and other grooming or apparel needs.
- Entertainment & Social: Going out with friends, movies, hobbies, events, or any discretionary spending on leisure activities.
- Miscellaneous: This is your catch-all for unexpected small purchases or items that don't fit neatly into other categories. It’s good to set a small, realistic amount here to avoid "budget creep."
Setting Up Your First Budget Spreadsheet
Let’s walk through creating a basic, yet effective, budget. Imagine you’re using a new spreadsheet. We’ll use sample numbers to illustrate.
- 01Create Columns: In row 1, set up your column headers. Start with "Category," "Budgeted Amount," "Actual Amount," and "Difference." You might also add a "Notes" column for extra detail.
- 02List Income: Below "Category," enter your income sources. For each, put the expected amount in the "Budgeted Amount" column. Let's say your part-time job is budgeted at $800/month, scholarships at $500/month, and family contribution at $200/month. So, in column B (Budgeted Amount), you'd have 800, 500, and 200. You’ll fill in "Actual Amount" as you receive the money.
- 03List Expenses: Below your income, list your expense categories. For fixed expenses, your "Budgeted Amount" will be your expected monthly cost. For variable expenses, estimate a realistic monthly figure. For example:
- Rent: $600 (Budgeted)
- Tuition (monthly portion): $1250 (Budgeted)
- Groceries: $300 (Budgeted)
- Textbooks: $100 (Budgeted, averaged monthly)
- Transportation: $80 (Budgeted)
- Entertainment: $150 (Budgeted)
- Subscriptions: $20 (Budgeted)
- 04Sum Totals: In a row at the bottom of your income section, use a formula like
=SUM(B2:B4)(assuming your budgeted income is in cells B2 through B4) to get your total budgeted income. If your income amounts are $800, $500, and $200, this formula would yield $1500. Do the same for actual income. Repeat this for your expenses, e.g.,=SUM(B6:B12)for budgeted expenses. If your expenses sum to $2500, this formula would yield that. - 05Calculate Net: Create a final row for "Net Income (Income - Expenses)." Your formula will look something like
=B_TotalIncome_Cell - B_TotalExpenses_Cellfor the budgeted net, and=C_TotalIncome_Cell - C_TotalExpenses_Cellfor the actual net. If your budgeted income is $1500 and budgeted expenses are $2500, your budgeted net would be -$1000, indicating a deficit. - 06Track Actual Spending: Throughout the month, as you spend money, log the actual amount in the "Actual Amount" column next to the relevant category. If you only received $750 from your part-time job, you'd enter 750 in C2. If you spent $320 on groceries, enter 320 in C7.
- 07Analyze the Difference: The "Difference" column (e.g.,
=C2-B2for the first income row, meaning Actual - Budgeted) will show you where you're over or under budget. A positive number here means you received more than budgeted; a negative number means less. For expenses, you might prefer=B2-C2to see how much you have left in your budget for that category. A positive number here means you're under budget for that item; a negative number means you've overspent.
A template like the Student Budget Worksheet can provide this structure immediately, saving you the setup time and offering pre-built formulas.
Using Formulas for Deeper Insights
Once you have the basic structure, formulas are your best friend. They automate calculations and provide instant feedback.
- SUMIF/SUMIFS: These are crucial for aggregating spending across multiple transactions within a single category. If you're tracking daily spending in a separate "Transactions" sheet, you can use
SUMIFto pull it all together. For example, on your "Budget" sheet, in the "Actual Amount" column for "Groceries," you might have a formula like=SUMIF(Transactions!$B:$B, "Groceries", Transactions!$C:$C). This formula sums all amounts in column C of your "Transactions" sheet where column B in that same sheet equals "Groceries." UsingSUMIFSallows you to add more criteria, such as summing only transactions within a specific date range, like=SUMIFS(Transactions!$C:$C, Transactions!$B:$B, "Groceries", Transactions!$A:$A, ">="&StartDate, Transactions!$A:$A, "<="&EndDate).
- XLOOKUP: This is a modern and flexible way to pull data from one table to another. If you have a list of expenses with dates and categories, you could use
XLOOKUPto find the budgeted amount for a specific category on your main budget sheet. For instance, if your "Budget" sheet has categories in column A and budgeted amounts in column B, and you have a separate list of "Monthly Bill Due Dates" with categories and amounts, you could use=XLOOKUP(A2, 'Monthly Bills'!$A:$A, 'Monthly Bills'!$B:$B, 0)in your "Budget" sheet's "Budgeted Amount" column. This looks for the category in cell A2 of your "Budget" sheet within column A of your "Monthly Bills" sheet and returns the corresponding amount from column B. The0at the end is a fallback if no match is found.
- Conditional Formatting: This is not a formula in the calculation sense, but it uses logical rules to format cells. It’s incredibly useful for quickly spotting where you are over or under budget. You can set rules like:
- If the "Difference" for an expense category (calculated as Budgeted - Actual) is less than 0 (meaning you overspent), turn the cell red.
- If the "Difference" is between 0 and 10% of the budgeted amount, turn it yellow.
- If the "Difference" is greater than 10% of the budgeted amount (meaning you have significant room), turn it green.
To implement this, select the "Difference" column for expenses, go to "Conditional Formatting," choose "New Rule," and then select "Use a formula to determine which cells to format." For red, the formula might be =$B2-$C2<0 (assuming your budgeted amount is B and actual is C, and you're applying it to row 2).
- AVERAGEIF/AVERAGEIFS: Useful for calculating average spending in variable categories. If you want to know your average monthly grocery spend over the last three months, you can use
=AVERAGEIFS(ActualAmountColumn, CategoryColumn, "Groceries", DateColumn, ">="&EDATE(TODAY(),-3)). This pulls the average from the "Actual Amount" column for all entries categorized as "Groceries" within the last three months.
Tracking Income and Expenses
The core of any budget is accurately recording what comes in and what goes out. This requires discipline, but the spreadsheet makes it manageable.
Logging Income: As soon as you get paid, enter the exact amount into the "Actual Amount" column for the corresponding income source. If your part-time job pays you $15/hour and you worked 20 hours, but the net deposit is $270 after taxes, enter $270. This ensures your "Actual Income" reflects what actually hits your bank account. If you have irregular income, like selling textbooks, create a separate row for "Other Income" and log it as it comes in.
Logging Expenses: This is where most people struggle. The key is to log expenses as soon as possible, ideally daily.
- Daily Check-in: Spend 5 minutes each evening reviewing your receipts or bank statements and updating the "Actual Amount" column. If you bought groceries for $45.50, find the "Groceries" row and add $45.50 to its "Actual Amount."
- Categorization is Key: Be consistent with your categories. If you buy coffee and a snack, decide if that falls under "Groceries" (if you'll make coffee at home later) or "Entertainment." Whichever you choose, stick to it.
- Receipt Management: Keep receipts for a week or two. This helps if you forget to log something immediately or need to verify a transaction. Many banking apps also allow you to attach receipt photos to transactions.
- Small Purchases Add Up: Don't ignore small cash purchases. The $5 coffee every day can easily add up to $150 a month, which could be a significant chunk of your "Entertainment" or "Miscellaneous" budget.
Common Budgeting Mistakes to Avoid
Even with a great template, it's easy to fall into common traps that derail your financial progress.
- Unrealistic Budgeting: Setting your "Budgeted Amount" too low for variable expenses like groceries or social activities will lead to constant overspending and frustration. Be honest with yourself about your typical spending habits before setting these figures. It's better to budget $400 for groceries and stick to it than budget $200 and consistently spend $350.
- Ignoring Small Expenses: Those daily coffees, impulse snack purchases, or app store buys might seem insignificant, but they accumulate rapidly. If you don't track them, they can make a huge dent in your overall budget without you realizing where the money went.
- Not Reviewing Regularly: A budget is a living document. If you set it up and then never look at it again, it's useless. Schedule a weekly or bi-weekly review to check your progress, see where you're overspending, and make necessary adjustments.
- Lack of a Buffer: Life happens. Unexpected costs, like a flat tire or a medical co-pay, can blow up your budget if you haven't accounted for them. Include a "Miscellaneous" or "Contingency" category with a realistic amount ($50-$100) to absorb these small shocks.
- Overly Complex Categories: While detailed tracking is good, having too many categories can become overwhelming. Stick to 10-15 main categories that make sense for your spending. You can always add more later if needed, but start simple.
Advanced Features and Tips
Once you're comfortable with the basics, you can enhance your spreadsheet.
Tracking Semester-Based Expenses
Many college expenses, like tuition and textbooks, are paid per semester, not monthly. To incorporate this into a monthly budget:
- 01Calculate Monthly Average: For a semester tuition bill of $6,000 over 4 months, budget $1,500 per month for tuition (
=6000/4). - 02Sinking Funds: For large, infrequent expenses like textbooks or even future car insurance payments, create a "Sinking Fund" category. Divide the total expected cost by the number of months until you need it, and budget that amount monthly. For example, if textbooks will cost $400 next semester and you have 3 months until classes start, budget $133.33 per month for textbooks. You can then transfer this "saved" money into a separate savings account.
Forecasting Future Balances
You can use formulas to project your bank balance based on your budget.
- 01Starting Balance: Add a cell for your current bank balance.
- 02Projected Balance: In a new row, create a formula that takes your starting balance, adds your budgeted income, and subtracts your budgeted expenses. For example, if your starting balance is in cell E1, total budgeted income in E2, and total budgeted expenses in E3, your projected balance for the month would be
=E1+E2-E3. You can then extend this formula to forecast future months by using the previous month's projected balance as the starting point. This helps you see if you'll have a surplus or deficit before the month even begins.
Using Multiple Sheets for Clarity
For more complex budgets, consider using multiple sheets:
- "Budget Overview": This sheet shows your monthly income, major expense categories, and the net difference.
- "Transactions Log": A detailed list of every single purchase, with date, item, category, and amount.
- "Income Sources": Details on each income stream, including expected pay dates and amounts.
- "Fixed Bills": A dedicated area to list all recurring monthly bills with their due dates and amounts.
Linking these sheets with formulas like SUMIF and XLOOKUP keeps your main "Budget Overview" clean while providing access to granular detail when needed.
Tracking Debt Repayment
If you have student loans or credit card debt, it's vital to track your repayment progress.
- Dedicated Debt Section: Add a section to your budget for "Debt Payments." List each debt separately (e.g., "Student Loan A," "Credit Card B").
- Interest vs. Principal: If your spreadsheet software allows, you can further break down payments into "Interest Paid" and "Principal Paid." This helps you see how much of your payment is actually reducing your debt burden. Many loan amortization calculators online can help you determine these figures for your specific loans.
- Visualizing Progress: Use conditional formatting or a simple progress bar (achieved with formulas and cell formatting) to show how much of a loan has been paid off. This can be a powerful motivator.