Get your free wedding planning spreadsheet now
Stop using scattered notes for wedding planning. A well-structured spreadsheet can consolidate everything, making the process manageable.
Using a scattered collection of notes and sticky pads for your wedding planning is a recipe for missed details and last-minute panic. A well-structured spreadsheet, however, can consolidate everything, from venue deposits to guest RSVPs, making the process manageable. The search for a wedding planning checklist spreadsheet free is common, and while free options exist, understanding how to build or adapt one is key to customization.
A digital checklist offers unparalleled searchability and organization. You can sort tasks by deadline, vendor, or category, and easily share progress with your partner or wedding party. This level of control is difficult to achieve with paper-based systems.
The Core Components of a Wedding Planning Spreadsheet
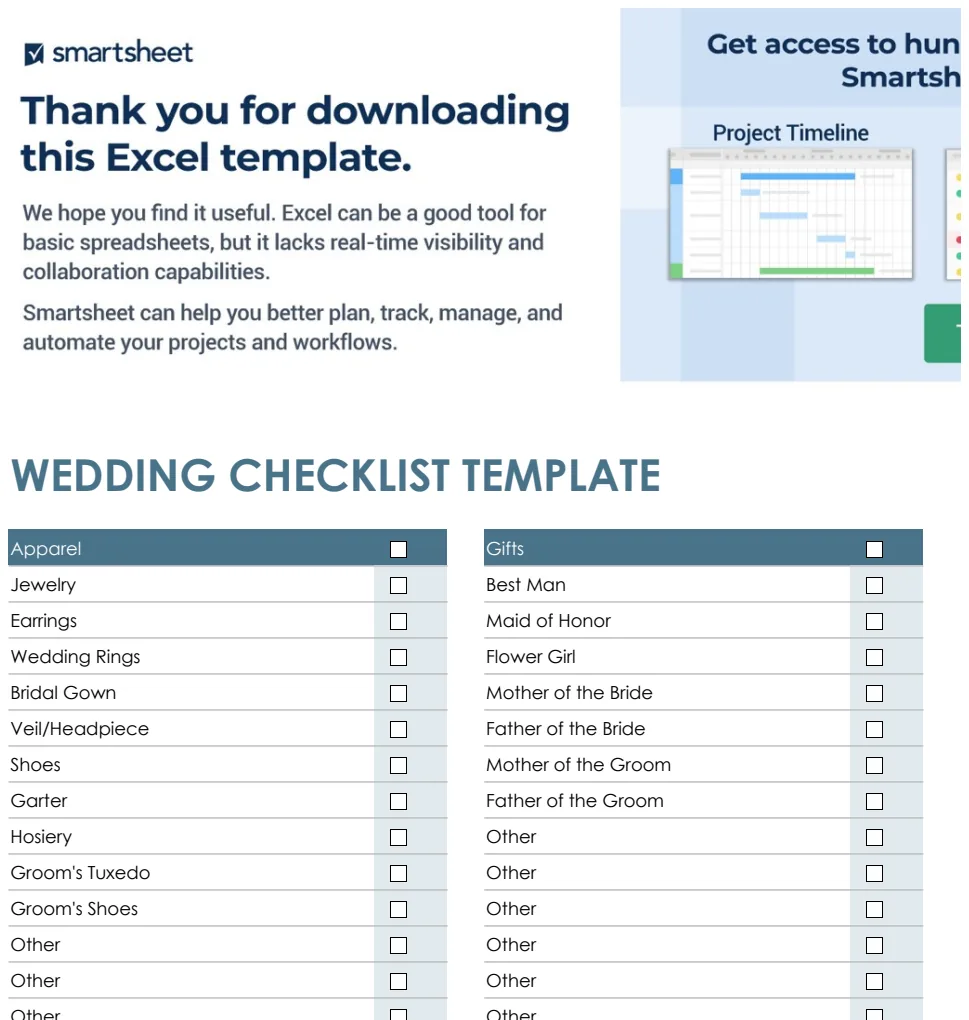
At its heart, a wedding planning spreadsheet needs to act as your central hub. This means including sections for every major aspect of wedding preparation. Think of it like building a digital binder. You'll want columns that track not just the task itself, but also its status, deadline, assigned person, and any associated costs. For a comprehensive solution right out of the box, you might consider a template like the Wedding Checklist Template, which already organizes these details.
Essential Columns for Your Checklist
Let's break down the critical columns you'll need. Imagine your spreadsheet has these headers:
- Category: This groups similar tasks. Examples include "Venue," "Attire," "Guest List," "Catering," "Decor," "Music," "Photography," "Invitations," "Rings," and "Honeymoon."
- Task: A clear, concise description of what needs to be done. For example, "Book ceremony venue," "Send save-the-dates," "Finalize guest count," "Order wedding cake," "Choose bridal party attire," or "Arrange transportation."
- Status: A simple dropdown with options like "Not Started," "In Progress," "Waiting for Info," "Completed," or "Cancelled." This gives you an instant visual of your progress.
- Due Date: The target date for completing the task. Formatting this column as a date is crucial for sorting and for using conditional formatting.
- Assigned To: Who is responsible for this task? This could be you, your partner, a parent, a bridesmaid, or a specific vendor.
- Vendor/Contact: The name of the business or person associated with the task (e.g., "The Grand Ballroom," "Sarah's Bridal Boutique," "DJ Mike").
- Contact Info: Phone number or email for the vendor/contact.
- Estimated Cost: What you anticipate spending on this item.
- Actual Cost: The final amount paid. This is vital for budget tracking.
- Deposit Paid: A checkbox or date field to indicate if a deposit has been made.
- Payment Due Date: When the final balance is owed.
- Notes: Any extra details, confirmations, or reminders specific to that task.
Building Your Spreadsheet: A Step-by-Step Walkthrough
If you're starting from scratch or adapting a basic template, here’s how to set it up effectively.
- 01Open a New Spreadsheet: Start with a blank sheet in your preferred spreadsheet software (Excel, Google Sheets, etc.).
- 02Create Header Row: In the first row, enter the column titles listed above. Make sure they are clear and descriptive.
- 03Format Headers: Bold the header row and perhaps freeze it so it stays visible as you scroll down.
- 04Add Categories: In the "Category" column, start populating with your main wedding sections. You can repeat categories for each task within that section.
- 05List Tasks: Under each category, list the specific tasks. Be detailed. Instead of "Venue," list "Research venues," "Tour venues," "Book venue," "Sign venue contract."
- 06Set Up Status Dropdowns:
- Select the entire "Status" column (excluding the header).
- In Excel, go to Data > Data Validation. In Google Sheets, go to Data > Data validation.
- Choose "List" as the validation type.
- In the source field, type your options separated by commas:
Not Started,In Progress,Waiting for Info,Completed,Cancelled. - Click "OK" or "Done." Now, each cell in that column will have a dropdown arrow.
- 07Format Dates: Select the "Due Date" and "Payment Due Date" columns. Go to Format > Number > Date to ensure they are recognized as dates. This allows for sorting and calculations.
- 08Input Costs: Enter your estimated costs in the "Estimated Cost" column. Format this column as currency.
- 09Add Conditional Formatting (Optional but Recommended):
- For Due Dates: Select the "Due Date" column. In Excel, go to Home > Conditional Formatting > Highlight Cells Rules > Less Than. Set it to highlight dates that are less than today's date and are not yet marked "Completed." In Google Sheets, go to Format > Conditional formatting, choose "Date is before" and "today," then select a formatting style.
- For Status: Select the "Status" column. Add rules to visually distinguish statuses. For example, green for "Completed," yellow for "In Progress," and red for "Waiting for Info" or overdue tasks.
- 10Populate Remaining Fields: Fill in "Assigned To," "Vendor/Contact," and "Contact Info" as you book vendors and delegate tasks.
- 11Track Payments: As you make payments, update "Actual Cost," "Deposit Paid," and "Payment Due Date."
Budget Tracking Integration
Your wedding planning checklist spreadsheet free can also serve as a powerful budget tracker. By adding "Estimated Cost" and "Actual Cost" columns, you can easily monitor your spending.
To get a running total:
- 01Add a new row at the bottom of your sheet, or a dedicated section elsewhere.
- 02In a cell, type
=SUM(G:G)(assuming your "Estimated Cost" is column G) to get the total estimated budget. - 03In another cell, type
=SUM(H:H)(assuming "Actual Cost" is column H) to see your total spent. - 04You can even add a variance column:
=H2-G2in row 2, then drag down to see the difference for each line item.
This immediate feedback on your budget is invaluable. If you find yourself needing more advanced budget features, a dedicated template might be helpful. For task management with priority, consider the Wedding Checklist with Priority template.
Common Pitfalls to Avoid
People often make a few key mistakes when setting up or using their wedding planning spreadsheets:
- Too Vague Tasks: "Book stuff" isn't helpful. Break it down into actionable steps like "Book photographer," "Book florist," "Book caterer."
- No One Assigned: If a task isn't assigned, it often falls through the cracks. Be specific about who owns each item.
- Neglecting the Budget: Focusing only on tasks and forgetting costs leads to financial surprises. Integrate budget tracking from day one.
- Not Updating Regularly: A spreadsheet is only useful if it's current. Schedule time each week to update statuses, add new tasks, and log payments.
- Overcomplicating: While detail is good, don't create so many columns or sub-tasks that it becomes overwhelming. Start with the essentials and add complexity as needed.
Customizing for Your Needs
While a robust wedding planning checklist spreadsheet free is a great starting point, your wedding is unique. Tailor it.
Adding Custom Columns
Do you have a specific concern, like managing out-of-town guests or tracking wedding favors? Add columns for:
- **Guest Accommodation Status